Wednesday, November 28, 2007

Pesto, Take Two

Asparagus Pesto with Baked Goat Cheese

As you may have guessed, I’m really into making different kinds of pesto. Traditionally, pesto refers to a puree of fresh basil, olive oil, garlic, parmesan cheese and pine nuts, but there is so much more you can do with it.

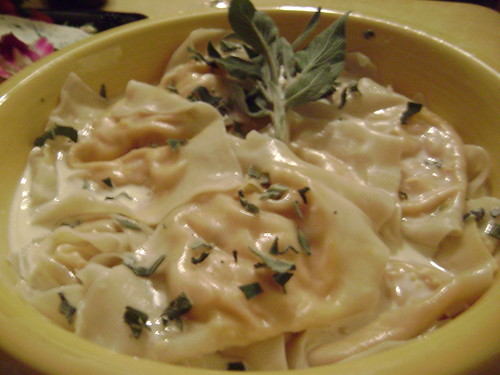
I made this asparagus pesto recently. I think I just love the idea of green noodles, which means I really ought to try making fresh spinach pasta, but you know, sometimes I’m lazy. So here’s the asparagus pesto:

Start out with a pound of the thinnest, youngest, most tender asparagus you can find. I know they aren’t in season right now, which totally sucks, but I end up buying it year-round anyway. Snap off the tough ends of each spear, and cook asparagus in boiling water for really just a few minutes—no more than 4. Take the asparagus out with tongs (rather than draining, so you can use the boiling water for pasta.) Cut off the tip of each spear (about 1.5 – 2 inches) and set aside. Chop the remaining spears into pieces.

Into your food processor, place:
The chopped spears,
2 cloves of garlic
1 tablespoon of olive oil
About 1.5 tablespoons of lemon juice
3 tablespoons of hot water from the asparagus/pasta pot
A handful of fresh basil leaves (just under ¼ cup, I’d guess.)
Process until smooth.

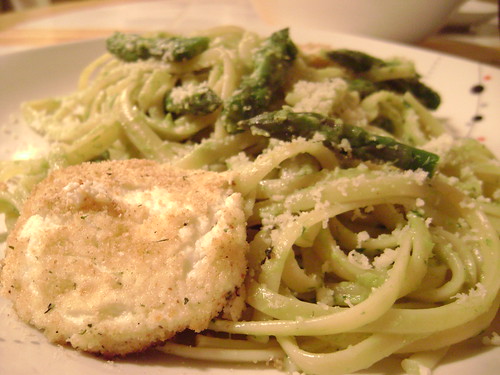
Serve over your choice of pasta (I used linguine) and top with the reserved asparagus tips and some grated parmesan.

WARNING: Don’t make this stuff if you’re planning on getting hot and heavy with anyone. You’re ingesting about a half-pound of asparagus per serving, so it makes your pee (and thus, your nether regions) smell like a garbage dump on a hot day in July. Seriously. I’m sorry.

I served this with baked goat cheese, because goat cheese is my new obsession (take that, milk allergy!) Goat cheese usually comes in a little roll of 4 ounces. Stick the whole package in the freezer for about 15-20 minutes before you start this, it makes the slicing go much easier, as goat cheese is pretty crumbly. Carefully slice into 4 rounds and dredge each round in seasoned bread crumbs. Place on a baking sheet and bake at 425 for about 6-8 minutes. Yeah!


The concept of baked goat cheese nearly pushed Rob to the brink of a nervous breakdown, but he pushed through. Unfortunately, I didn't freeze the goat cheese long enough and it was still a little crumbly, so that kind of sucked. But he really liked the pesto, so he gave it a rating7.5 hot dogs.


Monday, November 26, 2007

Soup Season!

Potato-Rosemary Soup

Sorry for the delayed posting, I've been busy sitting on my couch and being fat, post-Thanksgiving.
Anyway.
MMMM soup. Around this time of year, I’m pretty much obsessed with soup. It’s liquid, it’s chunky, it’s WHATEVER YOU WANT IT TO BE.

Anyway, I had made this soup a few weeks ago when Rob went out in the cold to play paintball with his coworkers (yeah-- I don’t know why, either.) and then promptly forgot to write down what I put in it. So I tried to recreate it last night and paid closer attention this time around.

In a large pot, sauté the following in a bit of olive oil:
3 garlic cloves, minced
2 celery ribs, chopped (leaves and all)
1 white onion, chopped (because Rob is so afraid of big chunks of onions, I always puree them before I put them in soup or sauce. It’s actually pretty nice, except that when you go to sauté pureed onion, it will burn your eyes like you wouldn’t believe. Seriously, do NOT lean over that pot.)

Sauté these all for a few minutes until the celery seems tender. Add to this two cans of vegetable broth and 12 small red potatoes, quartered (this is about 2 pounds, I’d guess.)
Cover and let boil, then cook about 15 minutes or until the potatoes are tender.

Once the potatoes are cooked to your liking, take out about 10 of the quartered potato pieces and set them aside. To the soup, stir in a few glugs of balf-and-half (I never said this was fat free, did I?) until the soup begins to turn white/light brown. Ew! It tastes better than it sounds, I promise.

Working in batches if you’re me, or all at once if you’re an awesome person that owns a big food processor, puree the soup until it is a thick consistency. Return to pot and add salt and pepper generously. Simmer for a bit, and add more half-and-half if you want it to be a lighter color, a bit of water for a thinner soup, etc.

Sprinkle the potato pieces you left out with some salt and cut them into smaller chunks. You could either put them back in the soup now, or divide them among the bowls once it’s been served.

Chop a few sprigs worth of rosemary very finely and add it to the soup. I find that rosemary flavor gets weak very quickly when cooked in soup, but if you don’t cook it long enough, it’ll be overbearing. Just keep tasting, you’ll know when it’s ready.

Ladle into bowls and add the remaining potatoes, if you didn’t before. Garnish with a sprig of rosemary (come on, like you’re ever gonna use all the rosemary that comes in that package) and eat.


This soup is awesome with stale-ish bread, oyster crackers, and watching the X-Files on DVD in bed with your loved one. Um, not that that’s what we do. We’re exciting and fun, I swear!

Rob gave it 8 hot dogs. Awesome!

Tuesday, November 20, 2007

Fancy Girls!

So this past weekend was my good friend Liz's 20-somethingth birthday, for which she hosted a dinner party at her house and enlisted my help. Amongst several other dishes, including spinach dip, a lasagna and a cheese platter that the kind people at Whole Foods put together so we didn't even have to, we also made a few other things.


Pumpkin Ravioli with Sage-Cream Sauce
The pumpkin ravioli was a recipe Liz found in a Rachael Ray magazine her roommate bought.

1 cup canned pure pumpkin puree
4 ounces cream cheese, softened
1/4 cup finely grated parmesan cheese, plus shaved parmesan for serving
1 large egg
Salt and pepper
32 wonton wrappers

1. In a medium bowl, mash together the pumpkin, cream cheese, parmesan, egg and 2 pinches each salt and pepper.
2. Line a baking sheet with parchment paper and set aside. Spoon a tablespoon of the pumpkin-cream cheese filling into the center of 16 wonton wrappers, brush the edges with water, top with the remaining 16 wrappers and press to seal, gently squeezing out the air. Arrange in a single layer on the prepared baking sheet.
3. Bring a pot of salted water to a boil.
4. Working in 3 batches, cook the ravioli in the boiling water until they float to the surface, about 3 minutes.

Surprisingly, we had very little trouble with this. Only one or two of the wontons burst, and only because the second you dropped them in the boiling water, they sank to the bottom and stuck immediately. The key seemed to be moving them around in the water constantly, especially in the first minute.

The Rachael Ray sauce was just butter and pumpkin seeds, so we decided to make a sage-cream sauce. Melt 2 tablespoons of a butter in a small saucepan until foamy. Add one chopped shallot and 2 tablespoons of chopped fresh sage, cook about 5 minutes. Add two cups of heavy cream (aw yeah) and three fresh sage sprigs, and simmer about 15 minutes or until sauce is reduced by half. Remove the sprigs of sage and serve over pasta.

The only things we decided we would change about this dish was that next time, instead of using two wontons to make a big ravioli, we would use the wrapping directions on the back of the wonton package and call em tortellini. Taste-wise, they were great, but the look of all the noodles was a bit weird. Also, people began to arrive as the sauce was still simmering, so I think I took it off the stove a little too soon and it was a bit runny. Oh well, lesson learned.


Sorry the picture is a little out of focus--Rob wasn't there to take it.

4-Layer Red Velvet Cake with Cream Cheese Filling and White Chocolate Ganache

The cake recipe came from Paula Deen:

2 cups sugar
1/2 pound (2 sticks) butter, at room temperature
2 eggs
2 tablespoons cocoa powder
2 ounces red food coloring
2 1/2 cups cake flour
1 teaspoon salt
1 cup buttermilk
1 teaspoon vanilla extract
1/2 teaspoon baking soda
1 tablespoon vinegar

Preheat oven to 350 degrees F.
In a mixing bowl, cream the sugar and butter, beat until light and fluffy. Add the eggs one at a time and mix well after each addition. Mix cocoa and food coloring together and then add to sugar mixture; mix well. Sift together flour and salt. Add flour mixture to the creamed mixture alternately with buttermilk. Blend in vanilla. In a small bowl, combine baking soda and vinegar and add to mixture. Pour batter into 3 (8-inch) round greased and floured pans. Bake for 20 to 25 minutes, or until a toothpick inserted into the center comes out clean. Remove from heat and cool completely before frosting.

Well, that was the recipe for three 8-inch cakes. I increased it by half to make four 9-inch cakes. Why? I don't know. I really don't.

The cream cheese frosting between each layer is just 8oz cream cheese, softened, mixed with half a stick of butter, softened, 1 tsp of vanilla and a 16oz package of powdered sugar, added in increments. Simple enough.

The white chocolate ganache was 13 ounces of Ghirardelli white chocolate, chopped into pieces. Over this, pour 1/2 cup of heavy cream that has been brought to the boiling point but not quite boiled. Now stir like hell until the chocolate melts and you have a goopy syrup. Pour over the top of the cake.

I should probably have made more ganache, as you can see it didn't quite make it the whole way down the cake, because the cake was like two feet tall. The red stuff on top is just the extra cream cheese frosting, thinned out with a little cream and tinted with red food coloring. It looks orange in the photo, but I promise it was red. The top is garnished with the leftover white chocolate pieces. This cake made people's bellies hurt, so...mission accomplished!!

Friday, November 16, 2007

Say Wahoo!

Wahoo (Fish) Tacos with Lime-Garlic-Cilantro Crema

So, in an effort to use up more of the aforementioned wahoo, I decided to make tacos. Now, when I say, “Let’s have tacos for dinner,” Rob thinks Taco Bell. That’s not what I had in mind. Traditional Mexican cooking does not include melted orange gunk, and I wasn’t about to cook up a pan of Grade D ground beef. Words that Rob never wants to hear in reference to what he’s eating: lime-garlic-cilantro crema. Oh well. It was good! This was also adapted from a Cooking Light recipe.

I cut the fish into fillets, which is one of the most disgusting tasks ever. I’d rather scoop the litter box with my bare hands. Into the raw fish, I rubbed a mixture of spices. The ratio was probably something like 1 part cumin, 1 part coriander, 1 part chili powder, ½ part garlic powder, ¼ part crushed red pepper and just a few shakes/grinds of salt and pepper. You could definitely up the spice factor on this with more red pepper. The fish was baked at 425 degrees for about 10 minutes, until it flaked easily with a fork (the best way to tell when most kinds of fish are done.) Into a bowl went the cooked fish, and I broke it up into bite-size chunks with a fork.

Split the fish between some warmed tortillas. I stupidly bought the fajita kind, but you should get the smallest kind possible. Add some shredded romaine (shred it yourself instead of buying the pre-shredded kind, it tastes so much crisper) on top of each and top with lime-garlic-cilantro crema. For this, mix equal parts sour cream and mayonnaise (Mayonnaise freaks me out a bit, but I happened to have some Veganaisse around, and it worked fine) and then equal parts of thinly sliced green onions and chopped cilantro. Add garlic, as much as you’d like, along with a few big squeezes of lime juice and, even more importantly, some grated lime rind. Mix it up and adjust it to taste.

In the pictures, you can’t really see the crema too well, but that’s because I got the world’s largest tortillas and by the time they were done, I was ready to just devour them, so we only got one picture before I had a taco in my mouth.


I served this with a corn and black bean salsa/salad, which was tossed with cilantro, lime juice, olive oil and a bit of salt.


I liked this one a lot— you had to tear a bunch of the tortilla off in order to get at the good stuff inside, but I thought the tanginess of the crema was a nice compliment to the slightly spicy fish.

Rob was “pleasantly surprised,” which is pretty much the best compliment you can hope to get when feeding him something he’s never tried before. He gave the tacos 8 hot dogs, and the salsa 6 (because he really only seems to like liquid-y salsas whereas I am more of a chunky salsa kind of girl), so we’ll even it out to 7.


You know what the worst part is? Right after I made this and effectively finished the wahoo, we went to visit Rob’s family, at which point his stepmother sent us home with another 10 pound bag of it. And a 10 pound bag of mahi-mahi. Looks like I need to come up with some good fish recipes.

Got any you’d like to submit?
Send 'em to thefoodsex@gmail.com

Monday, November 12, 2007

I Love Peanut Butter In a Sick, Sick Way

Shrimp "Pad Thai"

I am disgusting about peanut butter. I’ve definitely caught myself absent-mindedly eating directly from the jar. I’ve also absent-mindedly been growing a bit of a pot belly. Anyway.
One of my favorite things to do with peanut butter is making sauces for Asian-themed dishes, like this shrimp “pad thai.” I put the “pad thai” in quotes because I really don’t know what traditionally makes a dish “pad thai” so I don't want to be all, "Ooh, look at my pad thai," while you're all, "That is totally not pad thai."

So, to make this pseudo-pad thai, the recipe for which was adapted from Cooking Light, begin by cooking a bunch of spaghetti as you normally would. I used whole wheat because it was all I had around, and it was fine. Reserve some of the pasta cooking water for the sauce. To make the sauce, whisk together and set aside:

1/3 - 1/4 cup teriyaki sauce
3 big globs of peanut butter (I used Skippy Natural, creamy-style because that’s my eating-out-of-jar preference)
A squirt of Sriracha
2-3 tablespoons of the pasta cooking water

In a big skillet, heat some sesame oil. Add a clove of garlic, because seriously, I can’t make anything without garlic. Sauté for a minute or two. Add some peeled, deveined large shrimp with the tails removed. Cook for about 2 minutes. Shrimp really don’t take long to cook, I think the problem most people have is overcooking them, and then they get chewy and gross. Add the sauce mixture and cook for another two or three minutes. After this 4-5 minute period, the shrimp should be just about done. This is, of course, for large shrimp. If you were using smaller, obviously reduce the cooking time. If you were using an even larger kind, you’re a sick human being because this is pretty horrifying!


Anyway. So your nice normal-sized shrimp have been in the pan for 4 or 5 minutes. Add the cooked pasta and some green veggies--I used snow peas. Toss really well and cook just long enough to heat through the snow peas—about another two minutes. At this step, you could really throw in whatever veggies you wanted. Broccoli and bok choy would also be awesome, but I’d pre-steam any vegetables that take more than two minutes to cook. Okay. At this point I think I added a few more shakes of teriyaki sauce and a few shakes of soy suace, just to cover the noodles a bit better and encourage the sauce to spread around. Now, remove the pan from heat and add a whole lot of chopped cilantro. I really love cilantro, did you know that? Top with some peanuts, serve with limes for squeezin’, and voila, you’re done.


Rob really liked this, as he tends to like anything that seems like it could have been delivered to your front door in a paper bag. That’s just how he rolls!
8 hot dogs!


Wednesday, November 7, 2007

At Least Someone Can Bake...

...because I sure can't.

Chocolate-Peanut Butter Chip Cookies

I hate baking. You know, I always think I can do it, and everything usually turns out poorly. It’s all that exact measuring—when I cook, I like to dump some of this in, a little of that, then taste and see what it needs. I can’t be bothered to level off flour or measure out sugar. I do not have the patience to bake.

Alas, I always try anyway. I figured it’d be easy to make cookies using the recipe on the damn bag of Nestle Toll House chocolate chips. Hah. Right.

Here’s what you need:

2 1/4 cups all-purpose flour
1 teaspoon baking soda
1 teaspoon salt
1 cup (2 sticks, 1/2 pound) butter, softened
3/4 cup granulated [white] sugar
3/4 cup packed brown sugar
1 teaspoon vanilla extract
2 eggs
2 cups semi-sweet chocolate chips
1 cup chopped nuts

Except I did 1½ cups of chocolate chips and 1½ cups of those Reese’s peanut butter chips. Mmm. Maybe that weighed down the batter too much, I don’t know. Oh well, onto the steps…

1. Combine flour, baking soda and salt in small bowl.
2. Beat butter, granulated sugar, brown sugar and vanilla in large mixer bowl.
3. Add eggs one at a time, beating well after each addition; gradually beat in flour
mixture.
4. Stir in chocolate and peanut butter chips.
5. Realize that there is a hockey game on television that you are missing.
6. Wander into living room, taking cookie dough with you.
7. Marvel at how the Versus Network’s NHL coverage is even worse than the local station's, a feat you never imagined possible.
8. Notice a slight stomach ache and realize you’ve eaten about 25% of the dough.
9. Curse.
10. Drop leftover dough by rounded tablespoon onto ungreased baking sheets.
11. Realize that even though you have eaten a good portion of the dough, this is gonna make a lot of cookies. You’re going to be up all night. Curse again.
12. Bake in preheated 375-degree oven for 9 to 11 minutes or until golden brown.
13. Realize that 11 minutes is probably too long when the first batch comes out sort of... black-ish. Curse. Wow, you’re on a roll!
14. Let cookies stand for 2 minutes; remove to wire racks to cool completely.
15. Wonder why your cookies are flat instead of puffy like the ones in pictures. Wonder if you should have added more baking soda?
16. Wonder what the hell you are doing to do with 3-4 dozen flat ass cookies.
17. Vow never to do this again.


That picture actually makes them look better than they do in person.

On the bright side, they actually tasted pretty good. As Rob put it, they aren’t much to look at, but if you close your eyes when you eat them, it’s a pretty enjoyable experience.

Here he is, proving it.


Oh Rob.


So he gave them a very generous 9 for taste, 5.5 for looks. I averaged this out to 7 hot dogs. I would have rounded up to 7.5, but I hate how my "half a hot dog" clip art is bigger than the full hot dog, and I don't feel like fixing it. Mediocrity at its finest!!


<

Tuesday, November 6, 2007

Contributions!

My evil twin is one hell of a baker. Laura once made this biscotti that she brought to my house, and I didn't speak to my then-boyfriend for nearly a week because he ate the last piece. It was that good. Her first contribution to my blog are these totally bitchin' monkey cupcakes she made for a child's birthday party:


Here is her recipe:

I wanted to use a banana cake recipe but the mom who wanted them, said all chocolate. This recipe made 48 cupcakes! Holy Bananas.

3 cups flour
1 1/2 t. baking soda
3 sticks of butter, supposed to be softened at room temp., I of course put them in the microwave for 10 seconds
1 1/2 cup sugar
8 ounces unsweetened chocolate, melted.
1 1/2 cup brown sugar
6 eggs
1 1/2 cup buttermilk
1 1/2 t. vanilla extract (don't be cheap, use the real shit)


Preheat oven to 350 degrees.

Line muffin tins with cupcake papers. Set aside.

In a small bowl, sift together the flour and baking soda. Set aside.

In a large bowl, on the medium speed of an electric mixer, cream the butter until smooth. Add the sugars and beat until fluffy, about 3 minutes. Add the eggs, one at a time, beating well after each addition. Add the chocolate, mixing until well incorporated. Add the dry ingredients in three parts, alternating with the buttermilk and vanilla (I of course did both all at once and my batter was super thick, but they baked to perfect tops!). Do NOT overbeat. Using a rubber spatula, scrape down the batter in the bowl to make sure the ingredients are well blended and the batter is smooth. Carefully spoon the batter into the cupcake liners, filling them about three-quarters full. Bake for 20–25 minutes, or until a cake tester inserted in the center of the cupcake comes out clean.

Cool the cupcakes in the tins for 15 minutes. Remove from the tins and cool completely on a wire rack before icing.


I made them Friday night and iced them Saturday morning with chocolate icing, large Nilla wafers, mini Nilla wafers, I cut small marshmallows in half for eyes and I used black and red gel for the nose and eyes. All the kids loved them, but they thought they were bought at the grocery store and didn't believe they were homemade.

Here are the finished products. How cute are they?


If you'd like to contribute a recipe, either send me the recipe and I'll make it to the best of my ability, or you can make it and then send me the recipe and photos to thefoodsex@gmail.com.